How To Style A Charming Early Spring Dough Bowl Centerpiece
Learn how to hang stacked art the right way with simple steps, helpful tips, and ideas inspired by beautiful botanical prints in my living room.
Sometimes hanging a picture is as easy as putting a nail in the wall. But when it comes to hanging stacked art, a little planning makes a big difference.
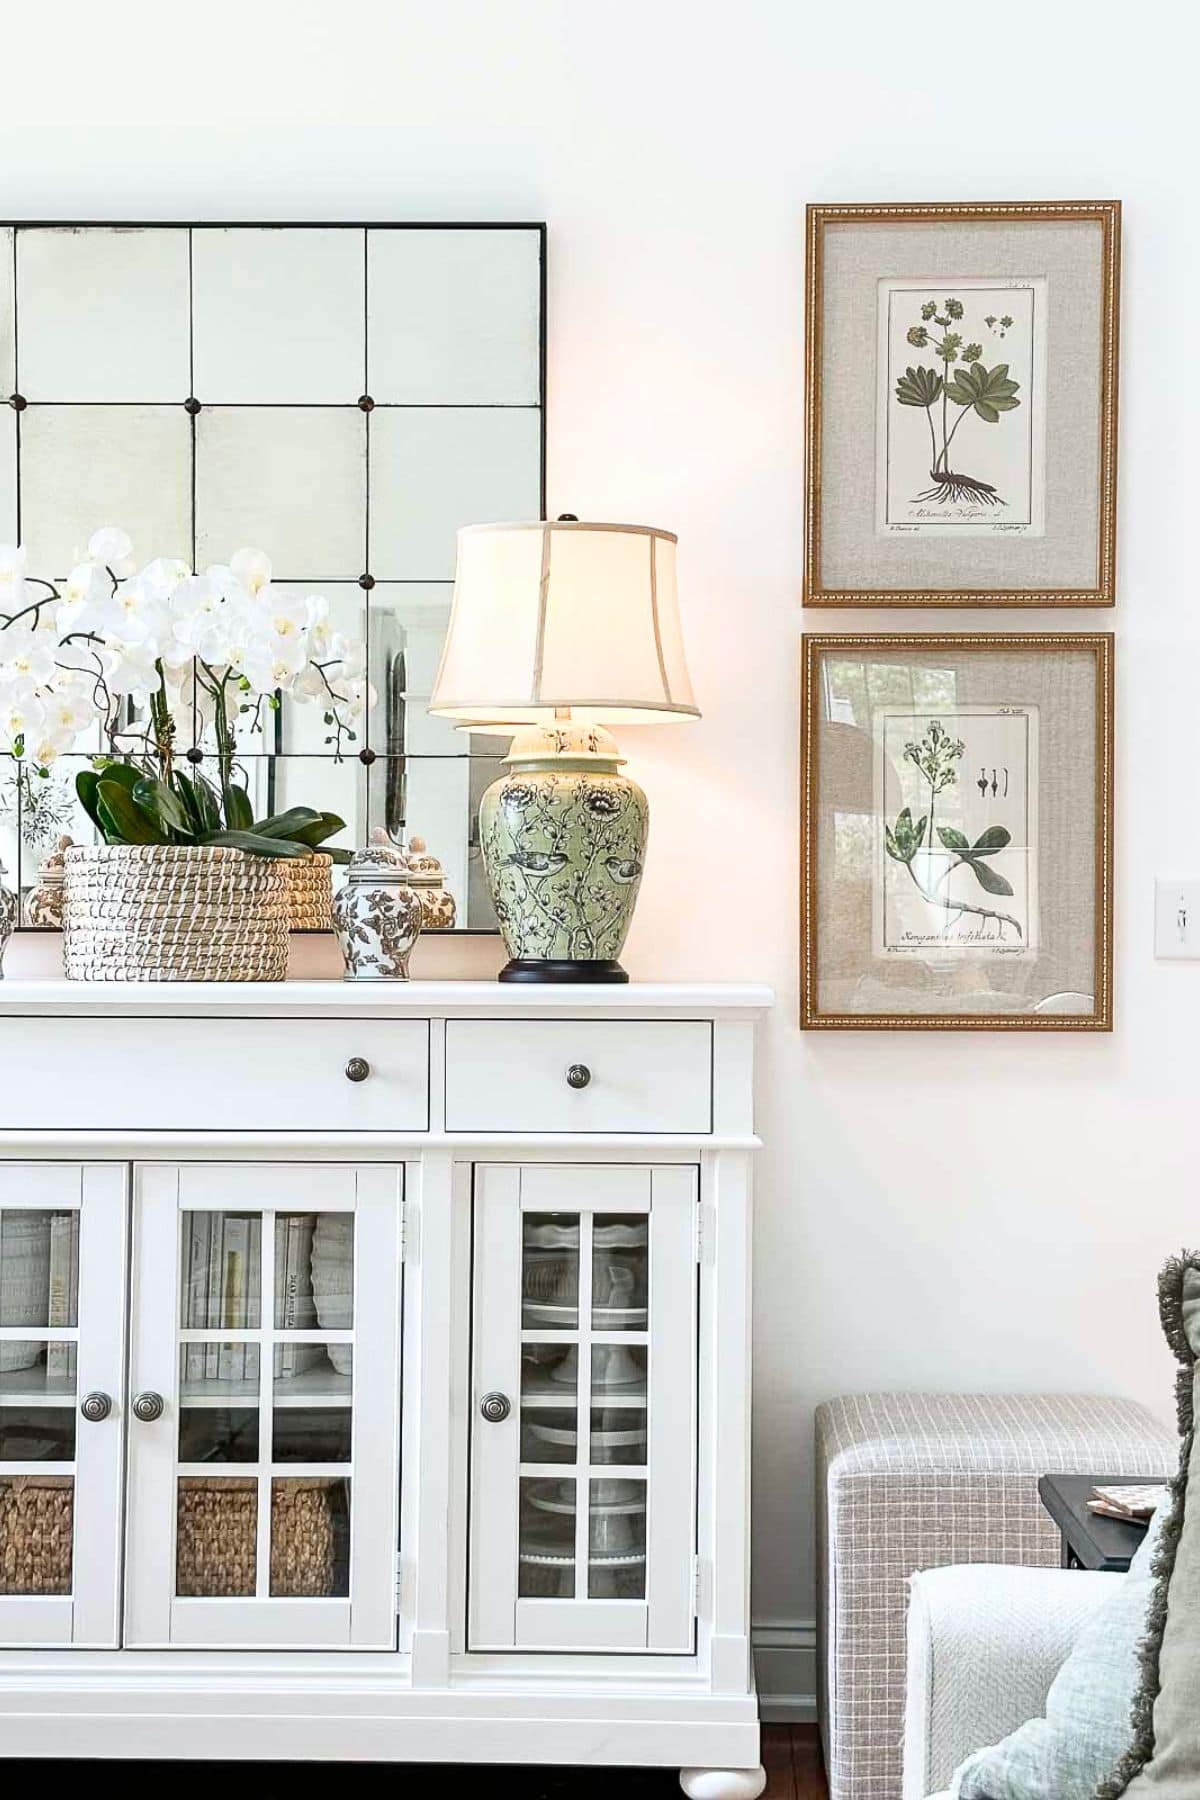
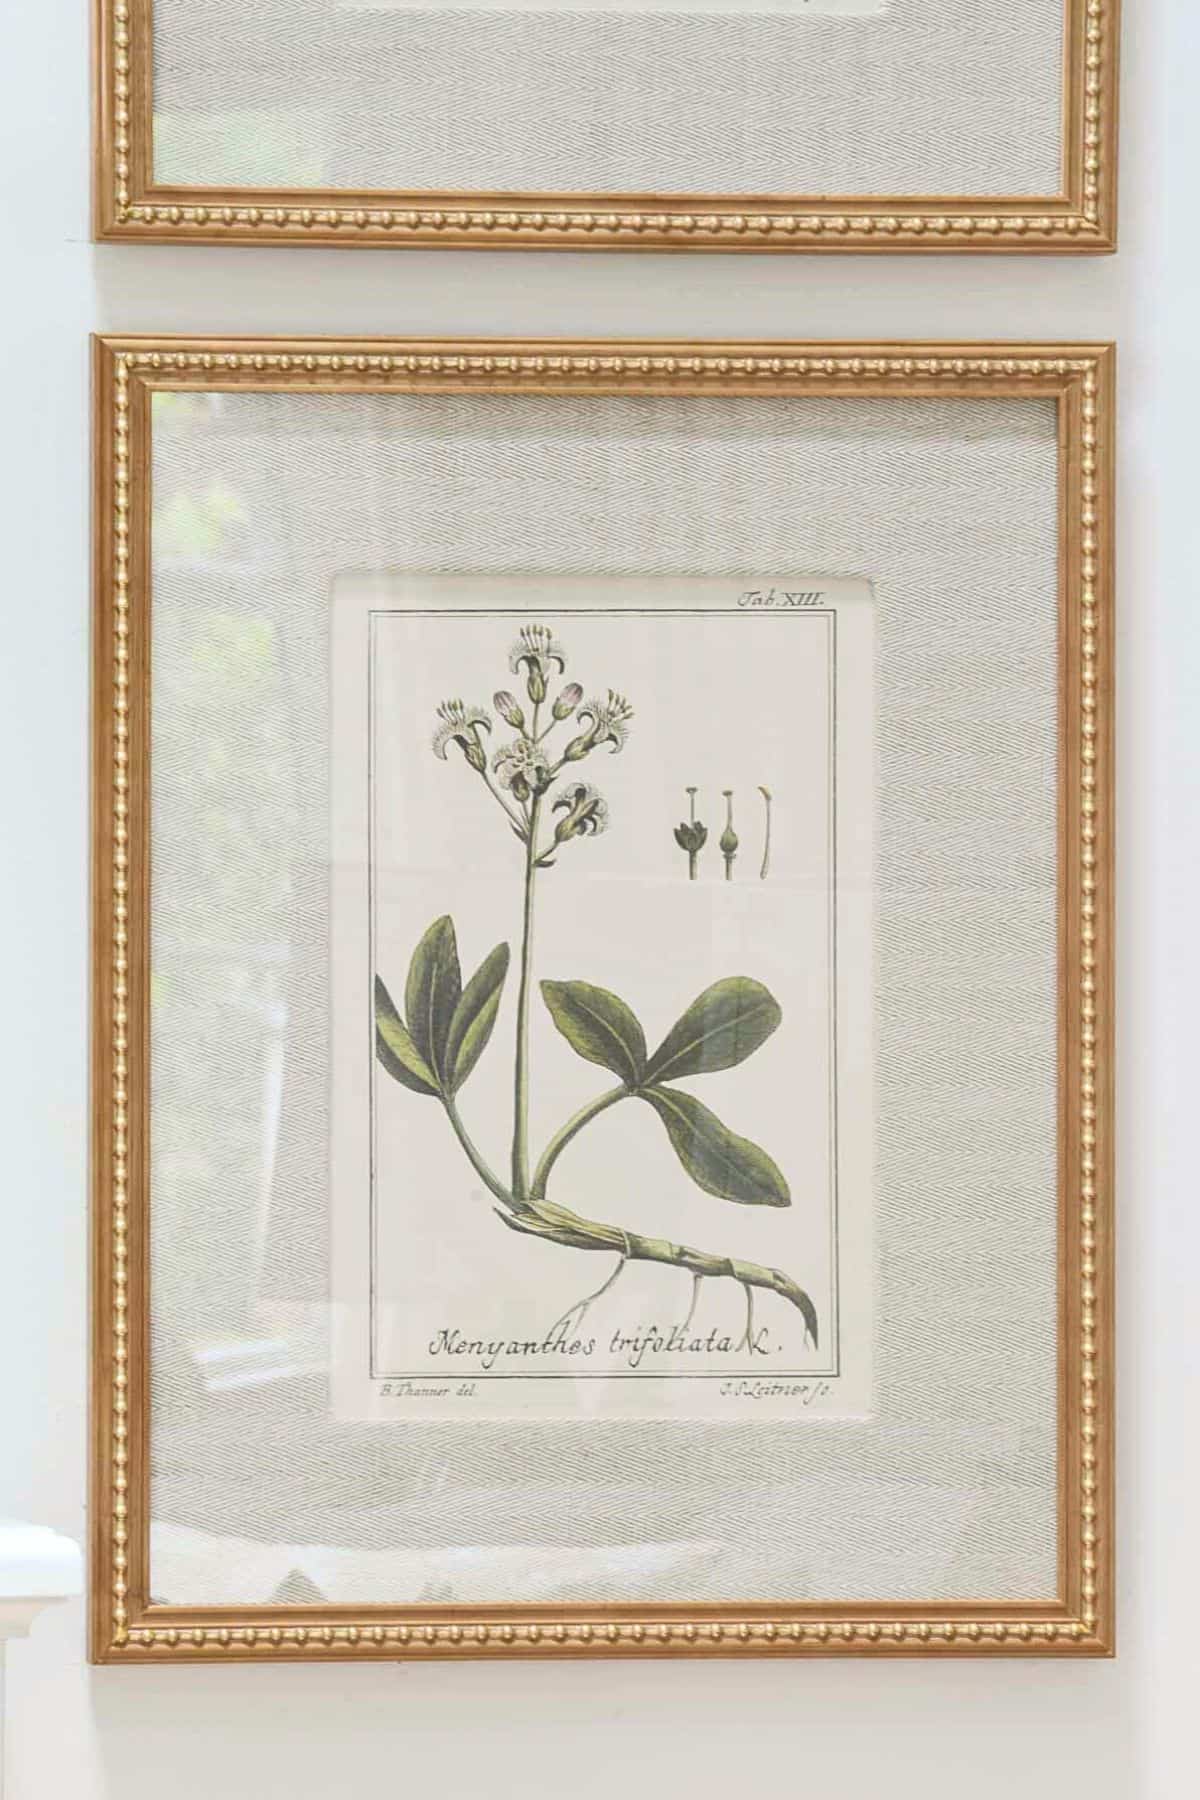
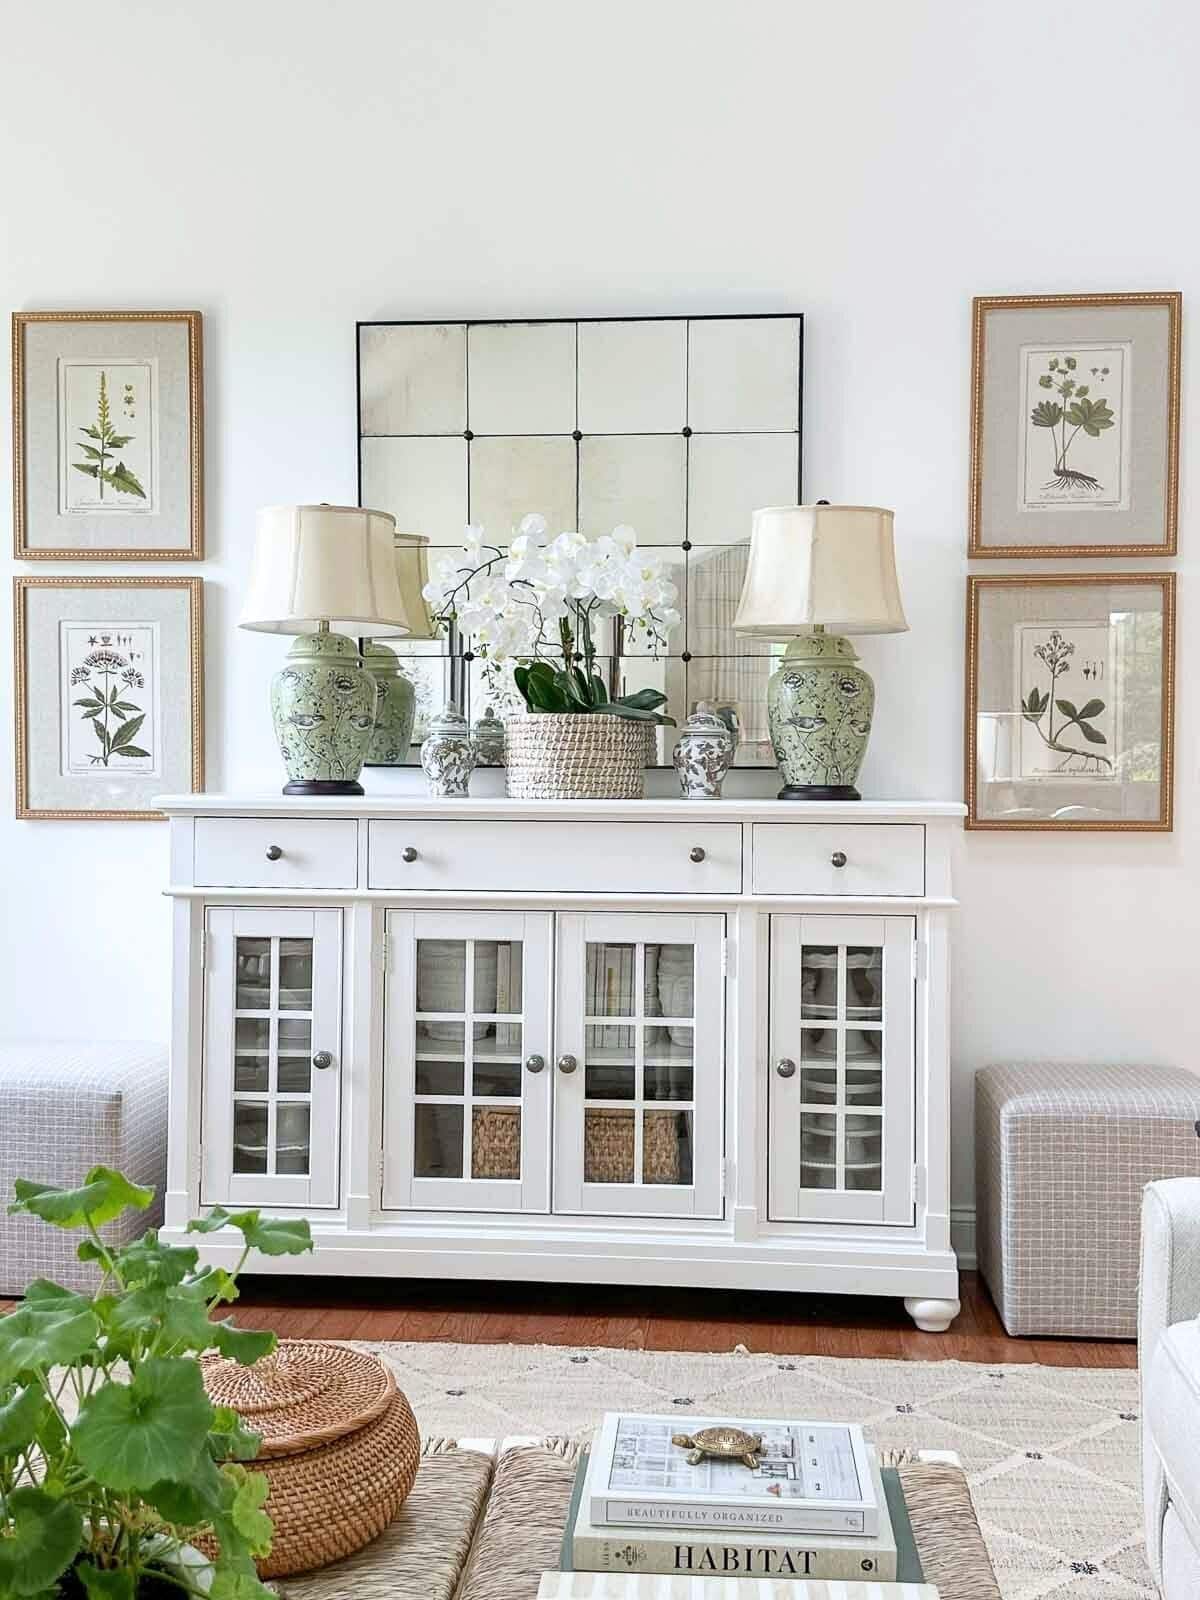
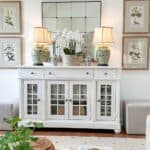
I’ve been thinking about adding new art to either side of the white buffet in our living room for about a year. I would occasionally browse for ideas online, but nothing really stood out—until I started looking at botanical art. I’ve always been drawn to those beautiful, detailed renderings of plants, especially the kind you might find in an 18th-century book. I love the illustrations that show the roots, leaves, flowers, and seeds all labeled with their proper Latin names.
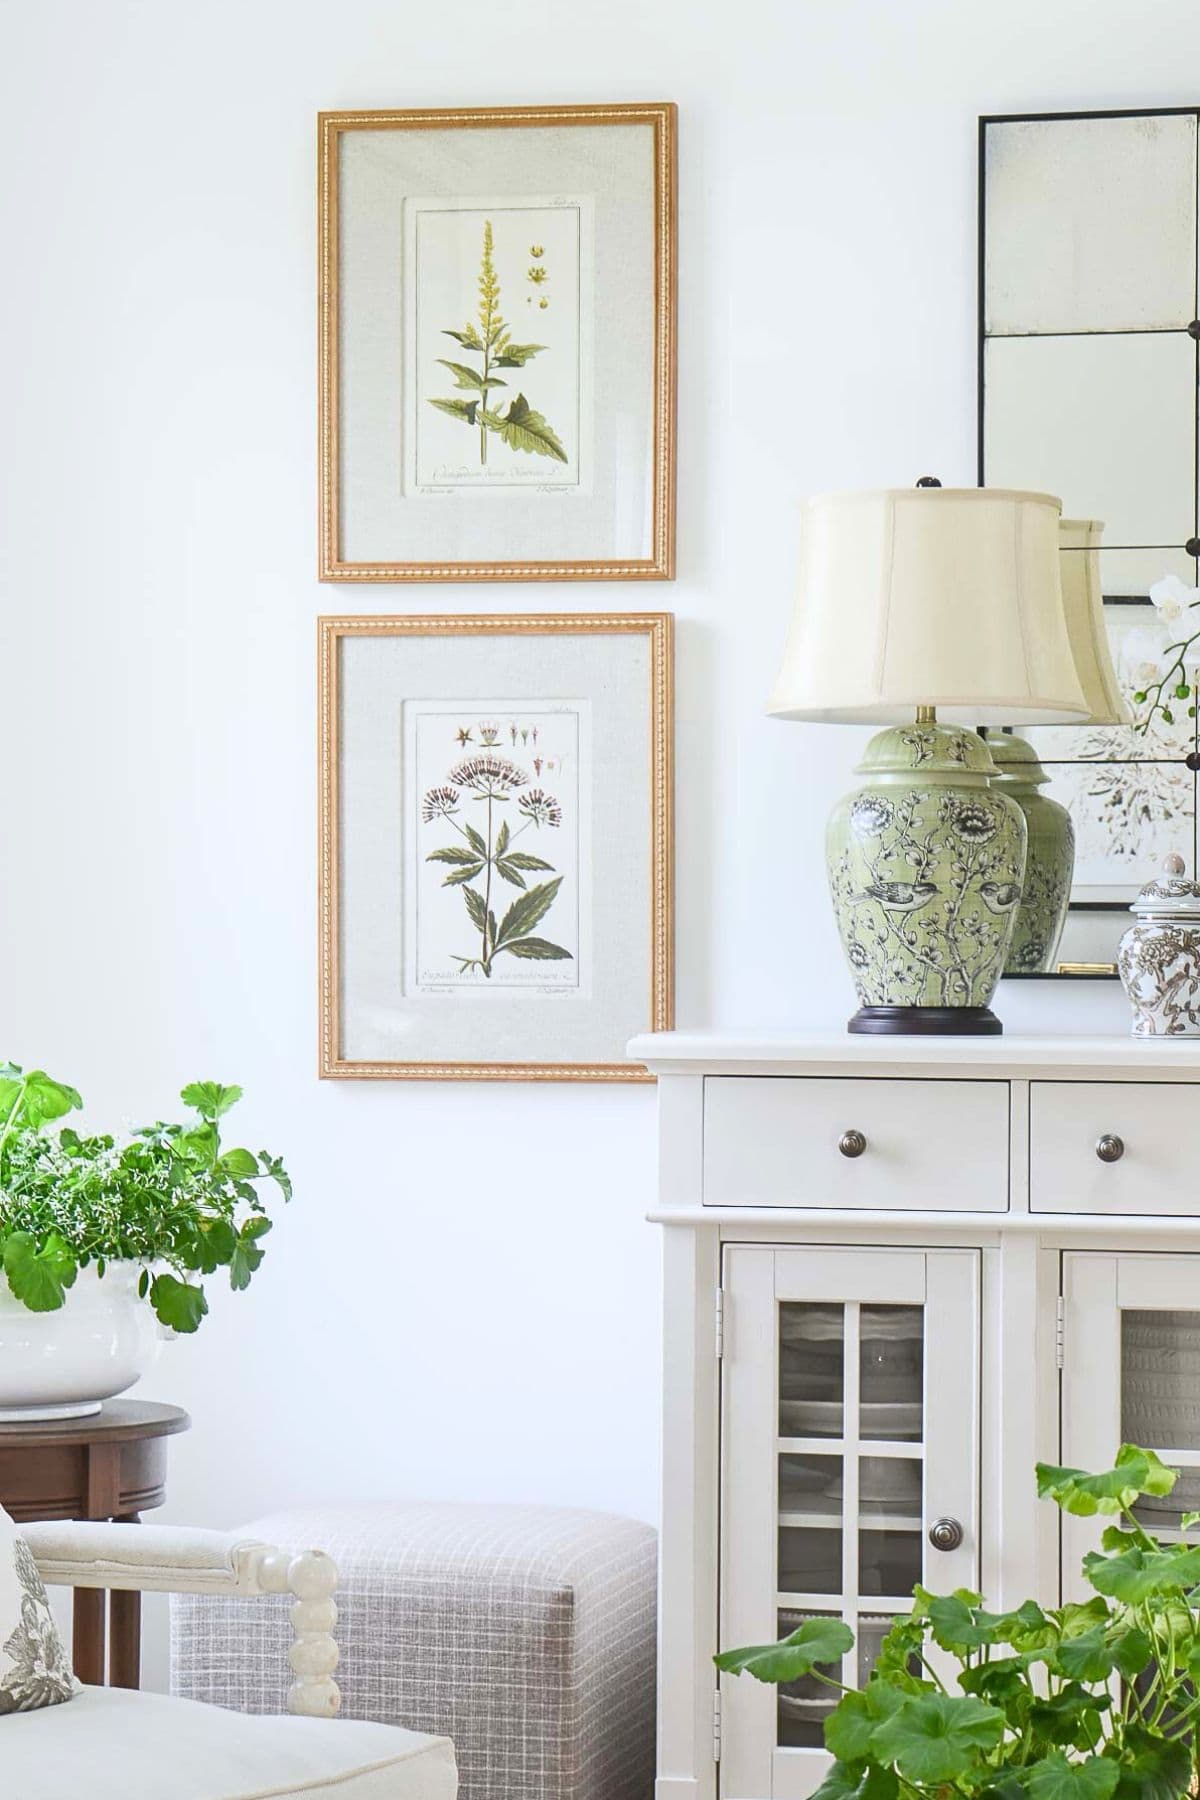
After a little searching, I found a set of six botanical prints that felt just right. Each one was matted in a lovely fabric and framed with a thin wood frame edged in raised gilded dots.
I used four of them as stacked pairs to flank the white buffet, and saved the other two for our smaller guest room.

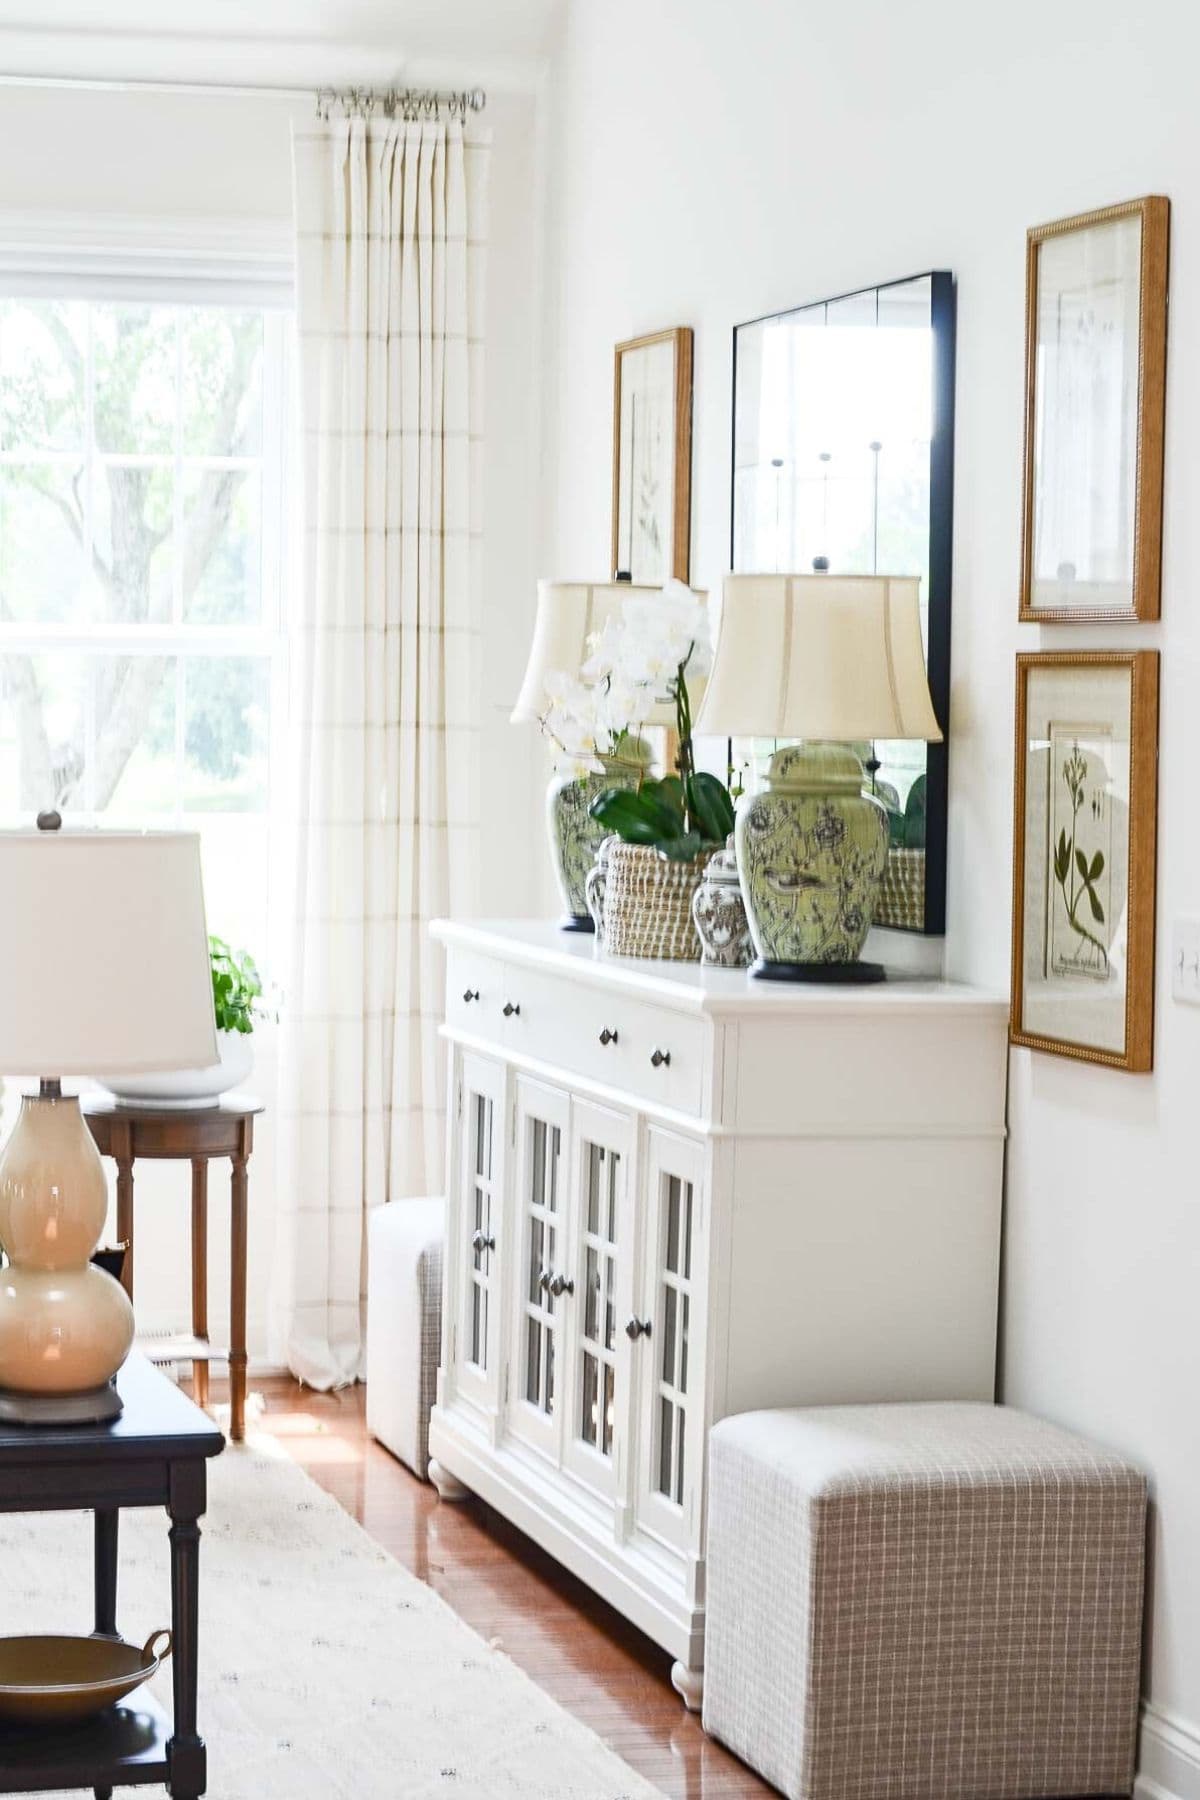
Adding stacked art to this space was exactly what it needed. The symmetry, balance, and classic feel of the botanical prints brought everything together.
What You Need
Before you start measuring or marking up your walls, gather a few simple tools and supplies. Having everything ready ahead of time makes hanging stacked art much easier. You might like to have someone help you if the stackable art is larger.
- Brown paper bags or craft paper (for making templates)
- Pencil
- Painter’s tape (don’t use tape you would use to wrap Christmas packages)
- Scissors
- Measuring tape
- Small level
- Hammer
- Nails or picture hangers (or wall anchors if your art is heavy)
- Step stool or small ladder
Step-By-Step Instructions For Hanging Stacked Art
Here’s how to hang stacked art so it looks balanced and beautiful on your wall…
1. Choose The Right Wall Space
Look for a wall where stacked art will have room to breathe. A narrow space, like beside a hutch, cabinet, or doorway, works especially well. Keep in mind how close the stacked pair will be to nearby furniture or other decor.
2. Measure The Artwork
Measure the height and width of each piece of art. If you’re using identical pieces like I did, this part is easy. If the sizes vary slightly, be sure to write everything down so you can plan properly.
3. Decide On The Spacing
Figure out how much space you want between the pictures. A spacing of 2–6 inches is typical. For my botanical prints, I felt 2 inches between each frame worked best to keep things symmetrical and tailored without feeling stiff.
4. Find The Vertical Center
To make sure the stacked pair hangs at the right height on the wall, add together:
- The height of both pictures,
- The space between them.
Then divide that number by 2. This gives you the center point of your stacked pair. Plan to hang this center point at eye level—about 57 to 60 inches from the floor works well in most rooms.
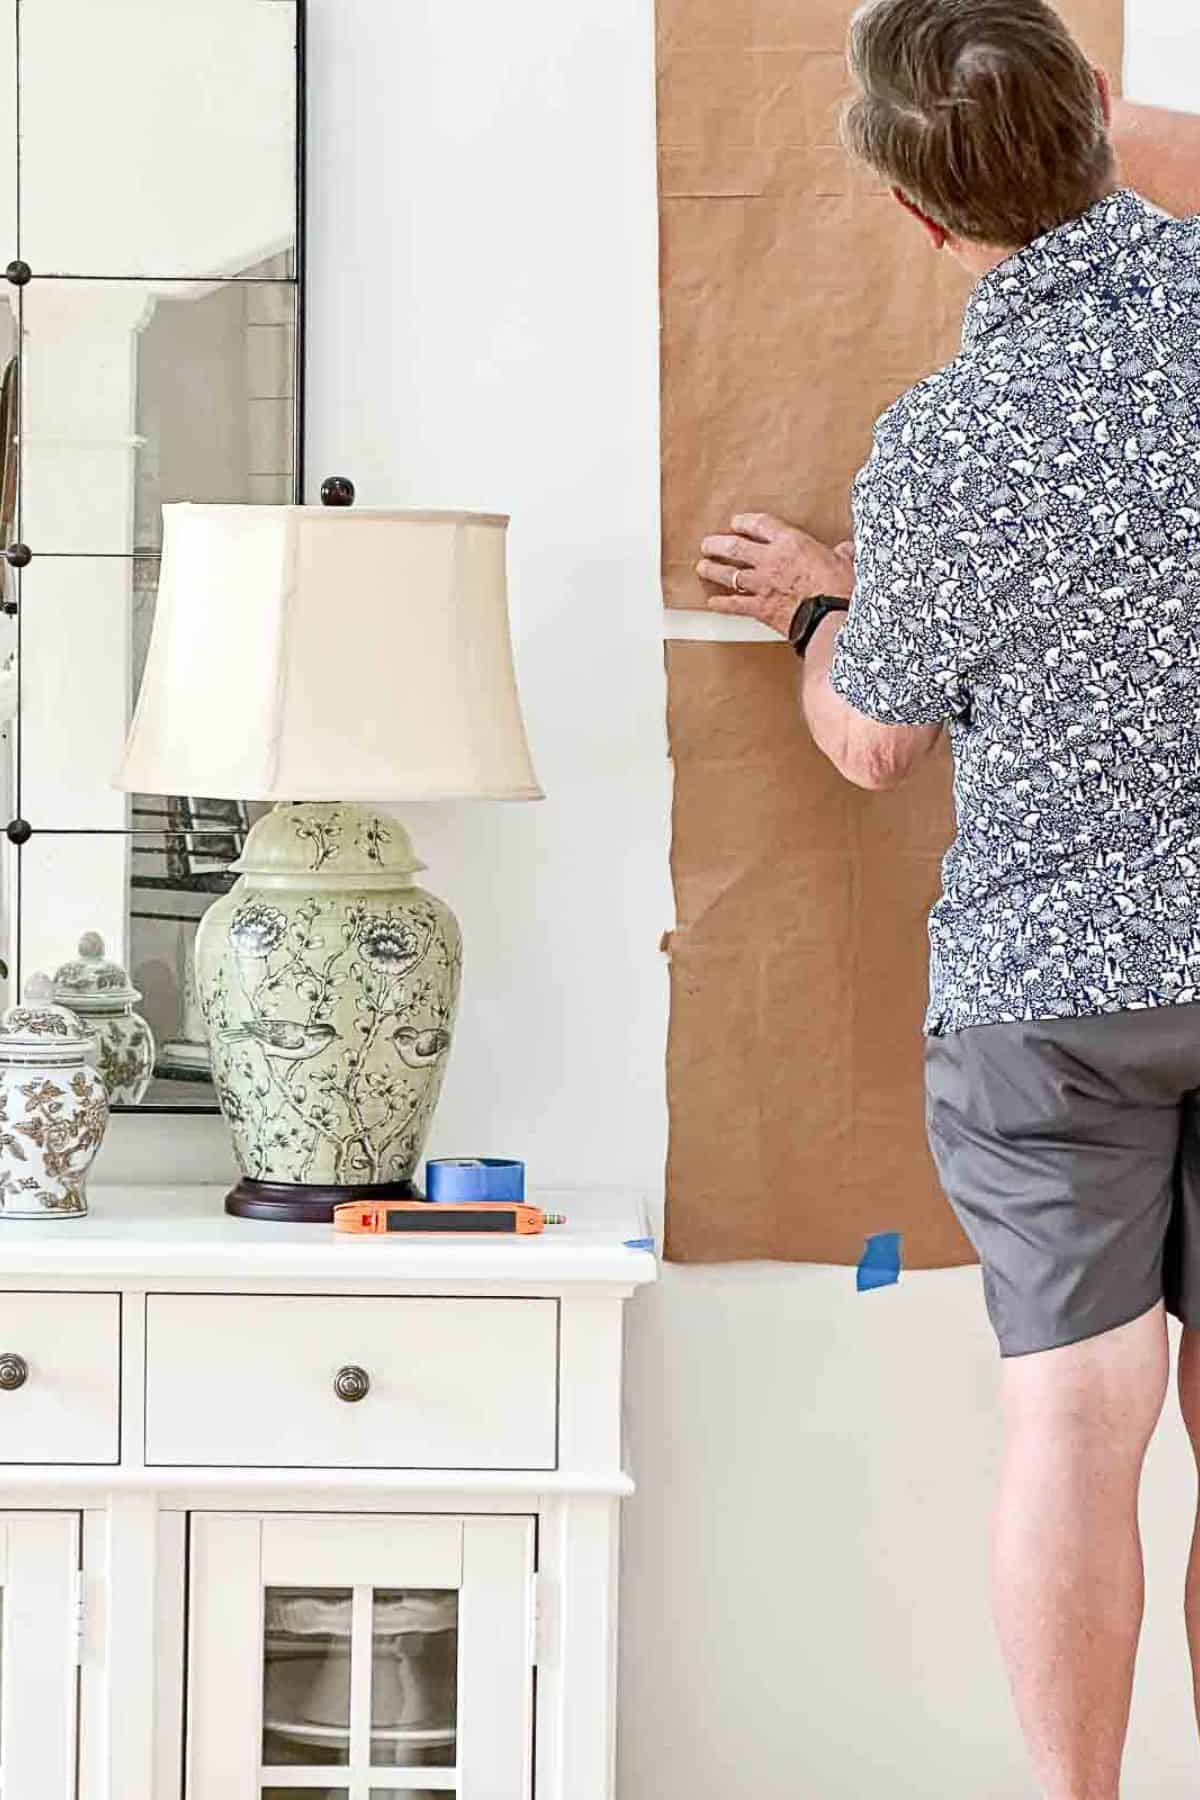
5. Make Paper Templates
Trace the outline of each frame onto craft paper or paper bags and cut them out. Mark where the nail or hanger would go on each one. Tape the templates to the wall using painter’s tape, and step back to make sure everything looks right.
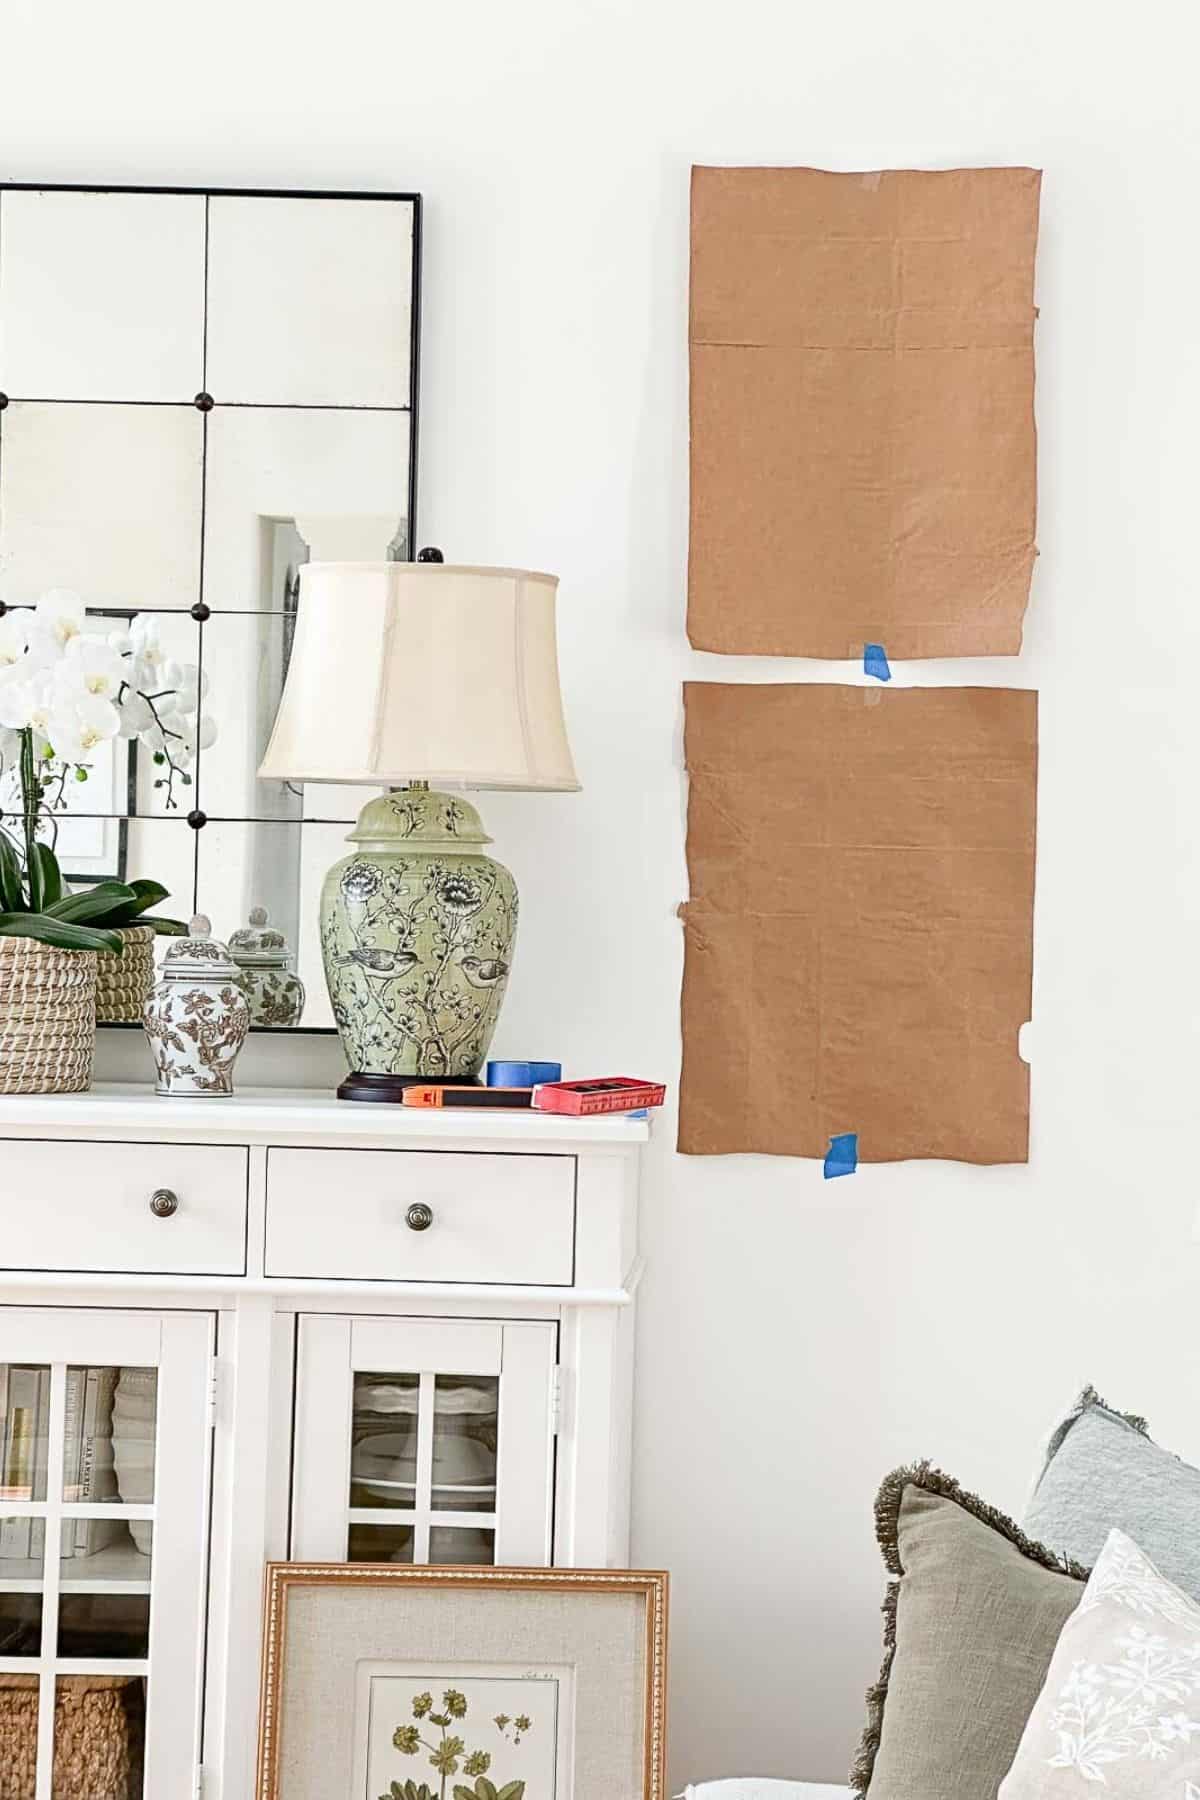
6. Mark The Nail Placement
Once you’re happy with the placement, use a pencil to lightly mark where each nail or hanger goes. A level will help make sure everything lines up nicely.
7. Hammer In Your Nails Or Use Wall Anchors
If your frames are heavy, use wall anchors for extra security. Otherwise, a basic picture-hanging nail will work.
8. Hang And Adjust
Hang each picture, check that everything is level, and step back to see how it all looks together.
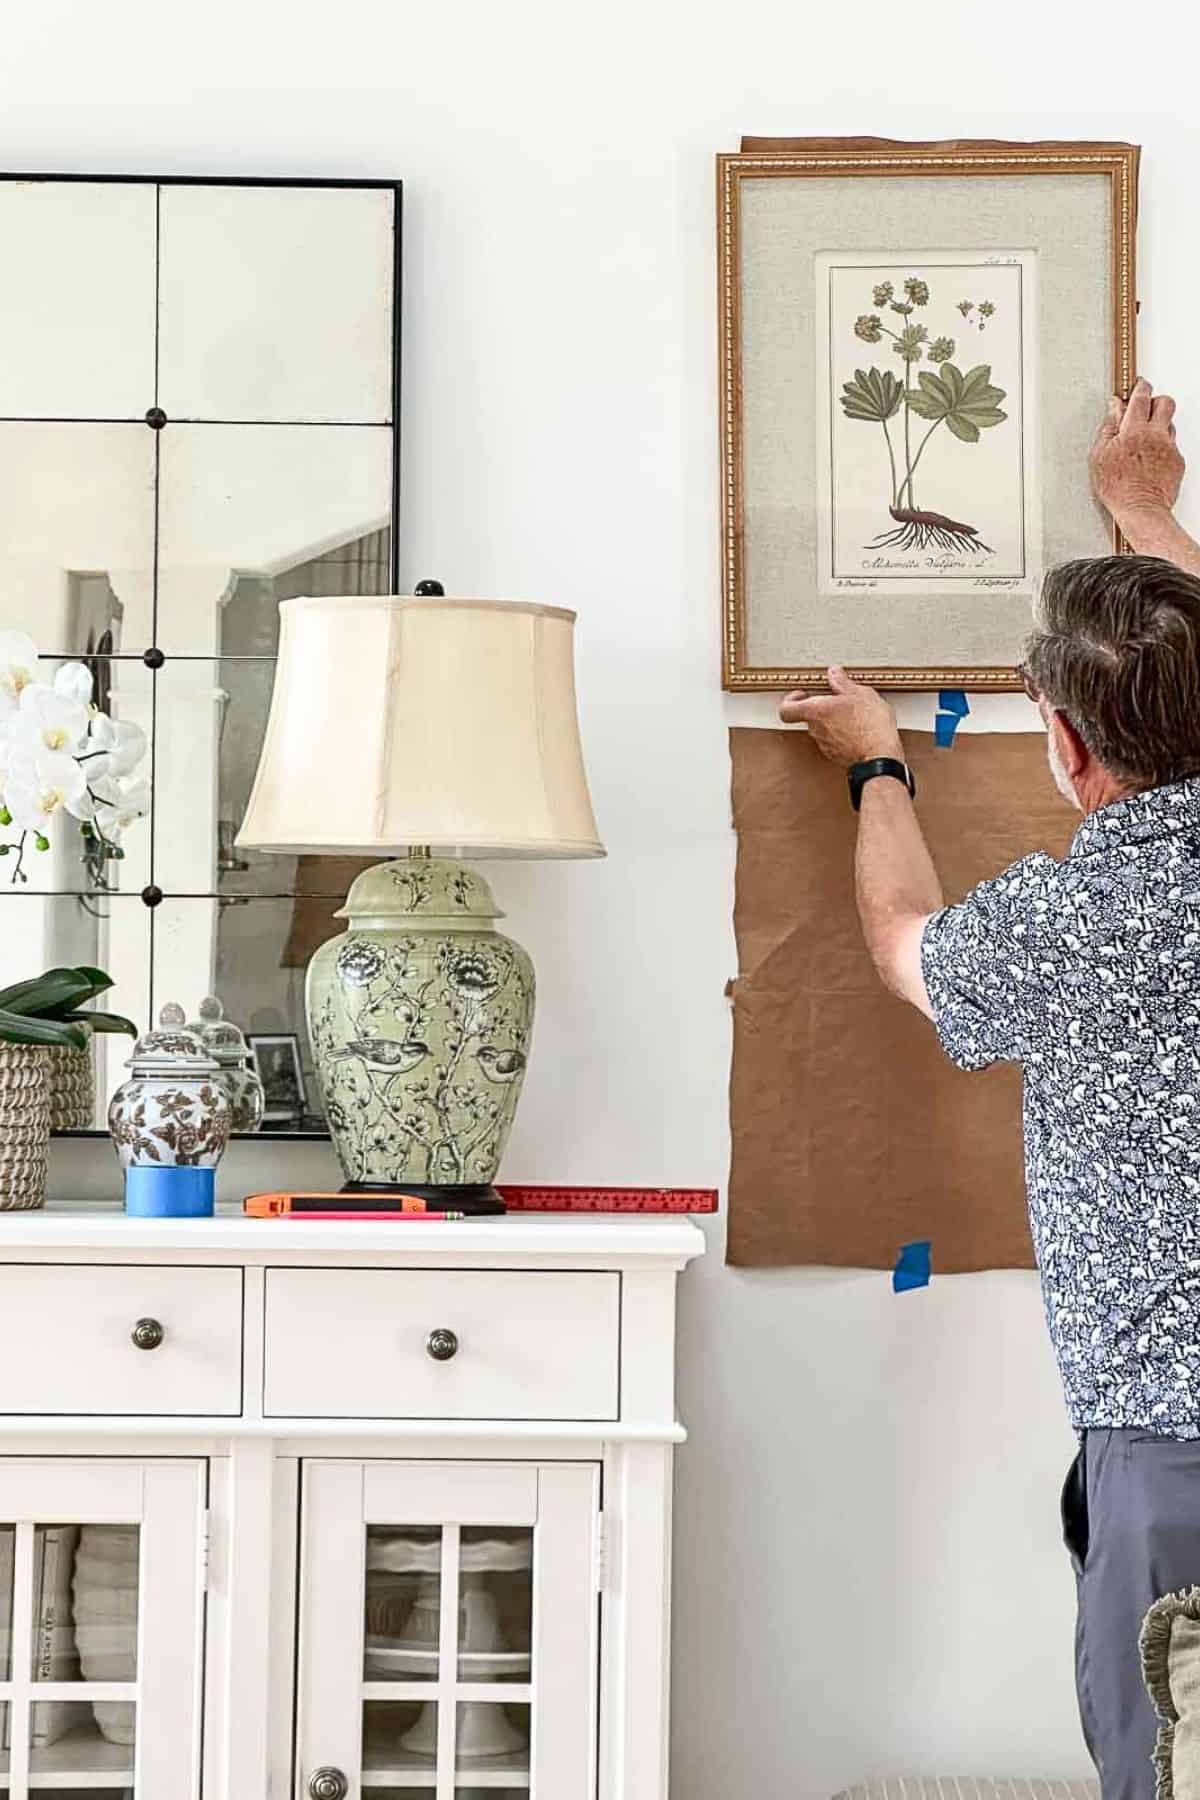
Make any final tweaks, and enjoy how your stacked pair of art brings a fresh, finished look to the space.
Helpful Tips For Hanging Stacked Pairs
These are a few of the most important things to remember when working with stacked art…
- Think of stacked art as one whole piece, not separate pictures.
- Keep 2–6 inches between each piece.
- For a more tailored look, keep the spacing closer together. For something more casual, leave a bit more room.
- Try to place the center of the overall display at a comfortable eye level.
- Always measure carefully. Note the distance from the top of the frame to the hanging hardware.
- Use a level and painter’s tape to help you mark your wall accurately before you commit.
Hanging Symmetrical Sets (4) Of Stacked Art
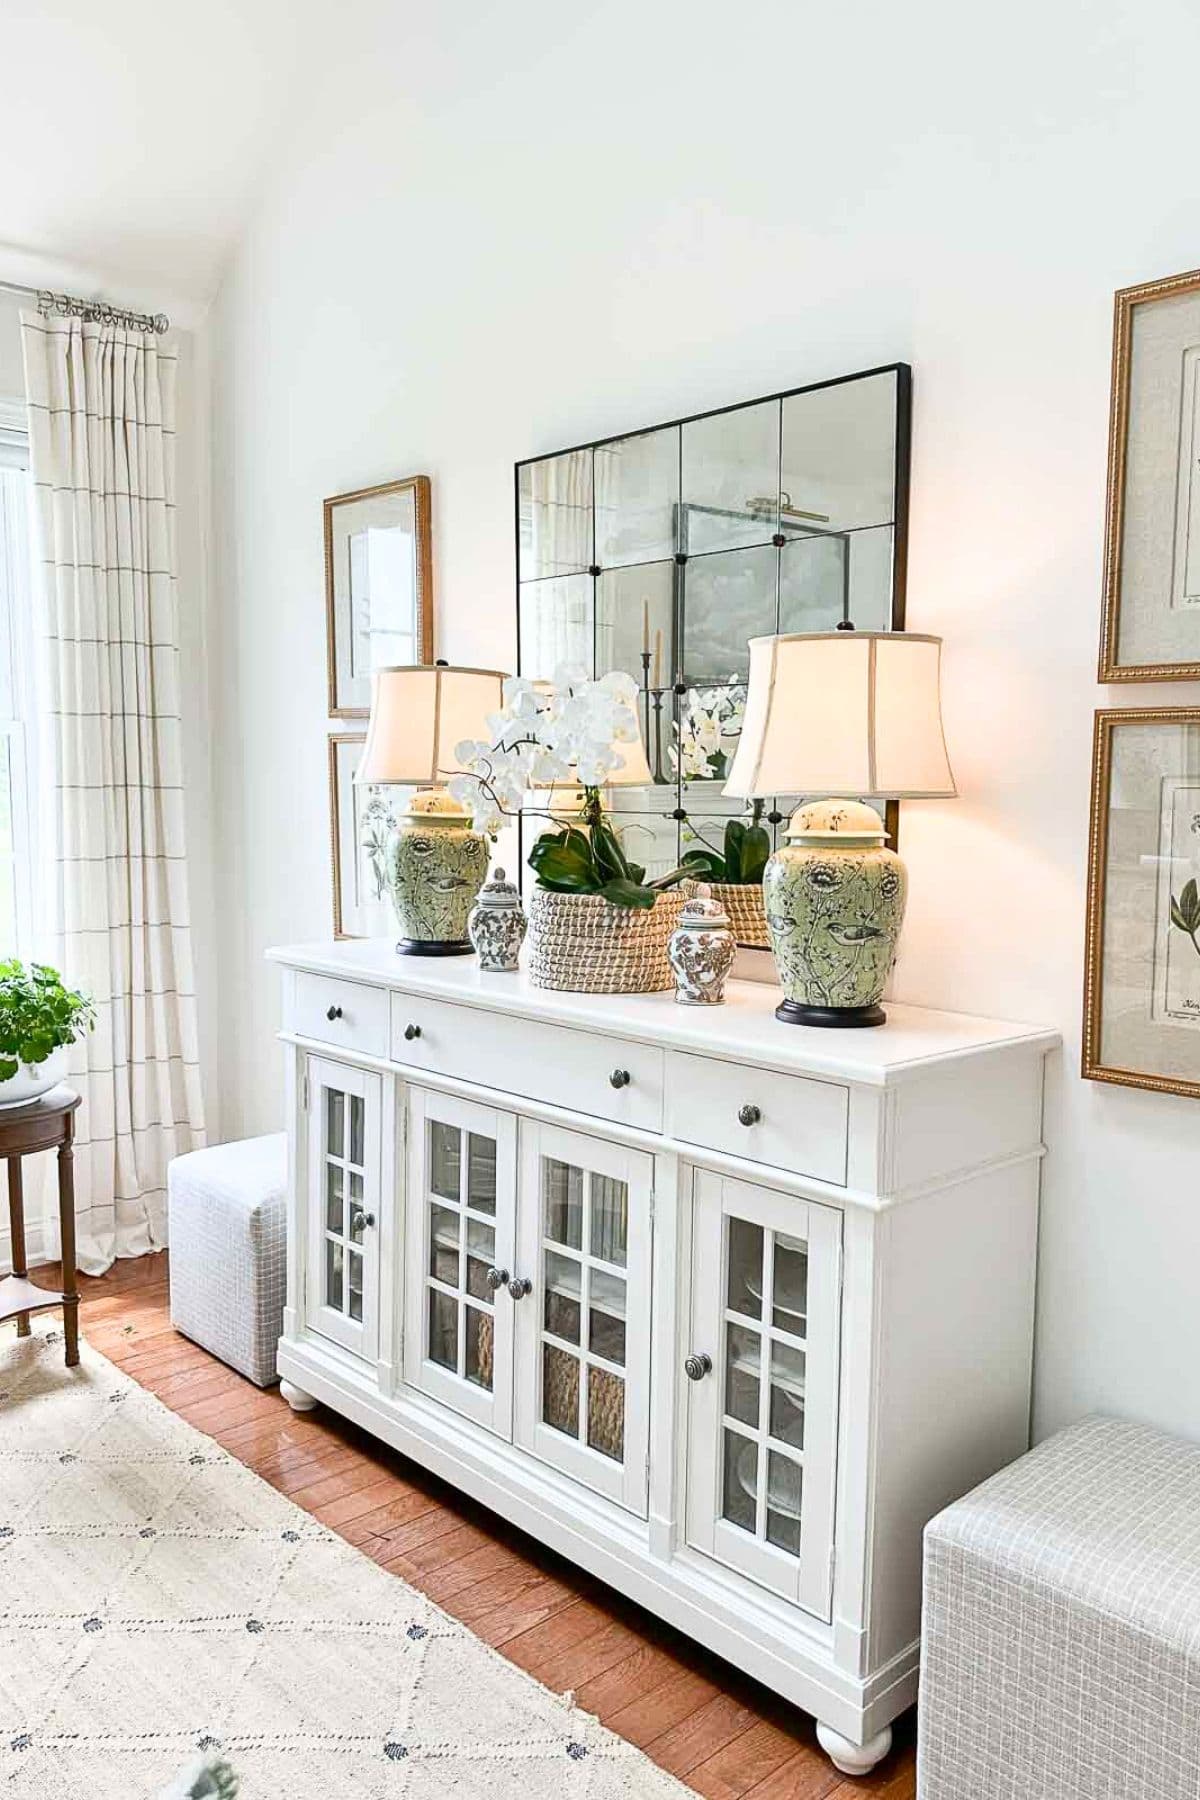
One of the prettiest and most polished ways to use stacked art is by creating a symmetrical set, like I did by hanging one stacked pair on each side of the white buffet in our living room.
This kind of arrangement works especially well when you want to frame or visually anchor a piece of furniture, a mirror, or a large object like a TV or painting. It brings balance to a space and draws the eye in all the right ways.
Here are a few helpful tips for hanging symmetrical stacked art…
- Start With One Side First
I began by hanging the stacked pair on the left side of the buffet. Once those were in place, I measured everything carefully to make sure the pair on the right side would be hung at the exact same height and distance from the buffet. - Measure From A Common Reference Point
Use the center of the furniture piece or the floor as a guide. Measure out the same distance on each side and mark it with painter’s tape. This will help keep everything perfectly even. - Double-Check Spacing And Height
Make sure both sides have the same amount of space between each picture, and that the center points of both stacked sets are aligned. - Step Back Often
After you tape your paper templates to the wall, step back and take a good look. This is where you’ll really see if anything needs adjusting before making holes in the wall. - Keep It Simple
Let the symmetry do the work. There’s no need to over-decorate the area around stacked art. Clean lines and a bit of breathing room will make the arrangement feel intentional and lovely.
Stacked art is such a classic way to add symmetry, interest, and beauty to your home. With just a few supplies, these handy step-by-step directions, and a little muscle you can hang art in a pretty and purposeful way.
More Posts To Enjoy
10 Timeless Home Decor Tips
These tried-and-true decorating tips will help you create a home that feels stylish, welcoming, and beautiful year after year.
5 Big Decorating Mistakes And How To Fix Them
If you ever feel stuck with decorating, chances are one of these common mistakes is the reason. Here’s how to easily fix them.
How To Layer Decor In A Room
Layering is the secret to a pulled-together home. Learn the steps decorators use to add depth, interest, and beauty to any room.
How To Refresh Your Living Room Without Spending A Lot
Your living room can feel fresh and new again with just a few simple changes. These easy ideas make a big impact.
How To Decorate A Sideboard Or Buffet
A sideboard or buffet is a perfect spot to show off your style. This post shares step-by-step tips for decorating it beautifully in any season.
Frequently Asked Questions
Most experts recommend placing the center of your artwork at about 57 inches above the floor—average eye level. But if your artwork is hanging above furniture (like your buffet), the bottom of the frame should sit 6–10 inches above the furniture top, even if that raises the center slightly above 57″. When hanging an art gallery, this rule does not apply.
A good starting point is 2–6 inches between frames. Tighter spacing (2–3″) creates a refined, formal look, while wider gaps (4–6″) offer a lighter, relaxed feel. Consistency is key. Use the same gap throughout the group.
Treat the two stacked pairs as mirror images. Start with one side: hang the first stack and note its center height and any other important measurments. Then, use those measurements to place the second stack. Double‑check your spacing so both sets match perfectly.
Shopping
Click the image to go to the item.

Happy decorating, friends…

Thank you for this very detailed and helpful post.
I love your lamps on the buffet. Can you share where you got them?
See it here:https://rstyle.me/+E92T5OgsIHDjrbJqjlabuQ
Here you go;https://rstyle.me/+KGK2romHi6YnvQBrUXievw
Love this vignette! May I ask where you found the white cabinet pictured here? I am looking for one like this with drawers across the top and cabinet doors below!
Thanks!
Dee Ann
Here you go! This buffet is really beautiful and well made.https://rstyle.me/+E92T5OgsIHDjrbJqjlabuQ
Oh Yvonne,
You forgot the most important step in this process! Namely, the guy in the Bermuda shorts. He should be No. 1 on the list!
LOL! He is!
Thank you for this post. It seems less intimidating now that you’ve broken it down into steps. 57 inches is also helpful to keep in mind.
You are so welcome, Donna
Thanks, Yvonne, for your instructions for hanging stacked pairs of pictures. This came at the perfect time as I have just ordered 4 prints to hang in our hallway by our mirror. Your pictures are lovely and look so nice on your wall. Your home is just beautiful! Once again, thank you for all you do in helping us make the right choices in order to make our home beautiful! Just appreciate you so much!
Hi Mary Ann! Thank you for the lovely comment. I’m thrilled to help.
Beautiful! May I ask where the buffet is from as well as which prints you used? Many thanks,
You can find the botanicals here https://rstyle.me/+qLcrntFaf9v0tWxIs-D0qQ and the buffet here https://rstyle.me/+n4iaTM3zecgD5-aRVV1kdQ